English
 Español
Content
- 1 What You Need to Know Before Installing a Rear View Camera
- 2 Tools and Automobile Parts You Will Need
- 3 Choosing the Right Camera Type and Mounting Location
- 4 Step-by-Step Installation: Wired Rear View Camera
- 4.1 Step 1 — Plan Your Cable Route
- 4.2 Step 2 — Mount the Camera
- 4.3 Step 3 — Connect the Power Wire to the Reverse Light Circuit
- 4.4 Step 4 — Run the Video Cable (RCA) Through the Vehicle Interior
- 4.5 Step 5 — Run the Trigger Wire (If Required)
- 4.6 Step 6 — Mount and Connect the Monitor
- 4.7 Step 7 — Test the System Before Reassembling Trim
- 5 Wireless Rear View Camera: Installation Differences and Considerations
- 6 Installation Variations by Vehicle Type
- 7 Common Installation Mistakes and How to Avoid Them
- 8 Integrating with an Existing Head Unit or Factory Display
- 9 Camera Maintenance and Longevity Tips
What You Need to Know Before Installing a Rear View Camera
Installing a car rear view camera is a straightforward DIY project that most vehicle owners can complete in 1 to 2 hours with basic tools. The core process involves mounting the camera at the rear of the vehicle, routing the power and video cables through the interior, and connecting everything to a display monitor. Whether you are working on a sedan, SUV, pickup truck, or hatchback, the fundamental steps remain consistent — though cable routing distances and mounting challenges vary by vehicle type.
In the United States, federal regulations have required all new passenger vehicles under 10,000 lbs manufactured after May 2018 to come equipped with a factory rear visibility system. If your vehicle predates that requirement, or if you drive a commercial van, RV, or trailer, adding an aftermarket automobile part like a backup camera kit is one of the most cost-effective safety upgrades you can make. DIY camera kits typically range from $50 to $200, compared to professional installation costs that can run $150 to $400 or more at a shop.
Before buying any camera system, you need to decide on two key things: how you want to view the camera feed (dashboard monitor, rearview mirror replacement, or integration with an existing head unit), and whether you want a wired or wireless system. Each choice affects the complexity of the installation and the final quality of the result.
Tools and Automobile Parts You Will Need
Gathering everything before you start prevents mid-installation delays. Below is a complete list of tools and materials required for a standard wired rear view camera installation.
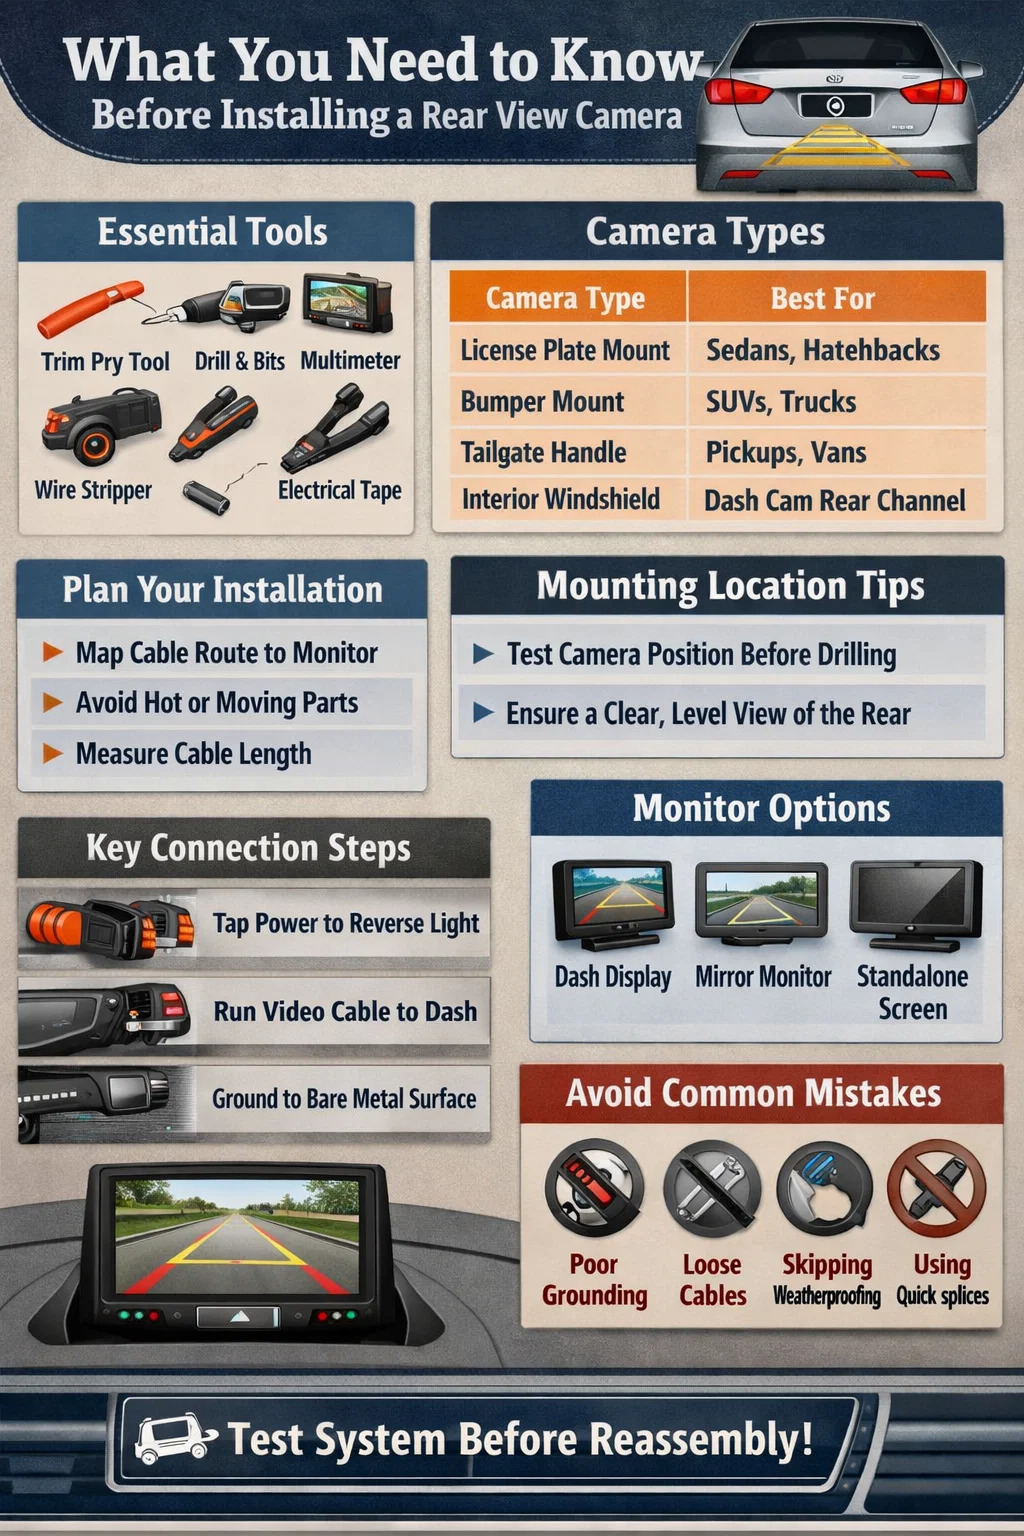
Essential Tools
- Panel removal trim tool (plastic pry tool) — essential for removing door sill plates and pillar covers without scratching interior trim
- Wire stripper and wire cutter
- Multimeter or test light — for identifying the reverse light wire in the tail light assembly
- Drill with appropriate bit — if mounting requires a hole through the bumper or trunk panel
- Electrical tape and heat shrink tubing
- Crimp connectors (butt connectors) — avoid quick-splice tap connectors as they are known to fail over time
- Zip ties and adhesive cable clips for securing runs
- Microfibre cloth and glass cleaner
- Screwdriver set (Phillips and flathead)
- Fish wire or wire fishing rod for routing cables through tight spaces
Automobile Parts and Components
- Rear view camera unit (weatherproof, minimum IP67 rating recommended for exterior mounting)
- Display monitor or rearview mirror monitor (or compatible head unit if integrating with an existing infotainment system)
- RCA video cable (length should be measured before purchase — most sedans need 15–18 ft, while SUVs and trucks may require 20–25 ft)
- Power cable and reverse trigger wire
- Mounting bracket or license plate frame mount (included with most kits)
- Wire loom or split tubing to protect cable runs near hinge points and sharp metal edges
Take photographs of your existing wiring before you begin. This single habit saves hours of troubleshooting if something does not connect correctly later in the process.
Choosing the Right Camera Type and Mounting Location
Not all rear view cameras are designed for the same application. Selecting the wrong camera type for your vehicle can result in a poor viewing angle, inadequate weather resistance, or a mounting position that creates blind spots rather than eliminating them.
Camera Types Compared
| Camera Type | Best For | Viewing Angle | Installation Difficulty |
|---|---|---|---|
| License Plate Mount | Sedans, hatchbacks | 120°–170° | Easy |
| Flush Bumper Mount | SUVs, trucks, vans | 130°–150° | Moderate (requires drilling) |
| Trunk Handle / Tailgate | Hatchbacks, pickups | 120°–140° | Moderate |
| Interior Rear Windshield | Dash cam rear channel | 140°–160° | Easy |
| Bullet / Bracket Camera | RVs, trailers, fleet vehicles | 90°–120° | Moderate to Complex |
For most passenger cars, a license plate area mount offers the fastest installation with minimal drilling and a naturally centered view. For SUVs and trucks where the license plate sits low and may be obscured by a trailer hitch, a bumper flush mount provides better visibility — though it requires drilling a hole approximately 3/4 inch in diameter through the bumper fascia. Tailgate handle mounts are popular for pickups because they create a clean, factory-looking finish without visible hardware.
Whatever location you choose, temporarily hold the camera in position and check the view on your monitor before committing to a permanent mount. You want a clear, level view with a small portion of the bumper or rear body panel visible at the bottom of the screen — this acts as a depth reference when judging distance to objects behind you.
Step-by-Step Installation: Wired Rear View Camera
A wired rear view camera system delivers the most reliable, interference-free performance. Follow these steps in order, and read your kit manual thoroughly before touching any wires.
Step 1 — Plan Your Cable Route
Before picking up a screwdriver, trace the path your cables will travel from the camera at the rear of the vehicle to the monitor at the dashboard. Identify all pillar covers, door sill trims, and headliner edges you will need to partially remove. The most common route runs from the trunk, under the rear seat, along the driver or passenger side sill, up the A-pillar, and to the dash area. Avoid routing cables near exhaust components or any moving mechanical parts. On larger vehicles, measure the cable run before buying — an SUV like a full-size Chevrolet Suburban may require a cable run of 22 feet or more.
Step 2 — Mount the Camera
Clean the mounting surface thoroughly with glass cleaner or isopropyl alcohol. Dirt and grease significantly reduce adhesive bond strength. If your camera uses screws, use the provided bracket and drill a pilot hole before driving fasteners. If your mounting location requires routing the cable into the trunk or cabin, drill a clean hole of appropriate diameter, then seal around the cable with a rubber grommet to prevent water ingress. Silicone sealant is also recommended around the camera housing on exterior mounts to prevent moisture from working behind the bracket over time.
Set the camera angle so that when you look at the monitor display, the lower 1/8 to 1/4 of the screen shows your vehicle's bumper. This ratio gives you the depth-sensing reference you need for accurate parking.
Step 3 — Connect the Power Wire to the Reverse Light Circuit
The most reliable way to power a rear view camera is to tap into the reverse light circuit. This means the camera only activates when the vehicle is placed in reverse, which protects the camera from unnecessary wear and prevents the monitor from showing a constant rear feed while driving.
Use a multimeter set to DC voltage to probe the wires in the tail light assembly. When you shift the vehicle into reverse (with the ignition on), the correct wire will show approximately 12 volts. Splice the camera's red power wire into this circuit using a crimp butt connector and cover the joint with heat shrink tubing. Connect the black ground wire to a clean, bare metal surface nearby — avoid painted surfaces as they create a poor ground connection that can cause video flickering.
Never use quick-splice tap connectors for this connection. They are prone to corrosion and intermittent failure, especially in the wet, vibration-heavy environment near the rear bumper of a vehicle.
Step 4 — Run the Video Cable (RCA) Through the Vehicle Interior
This is typically the most time-consuming part of a rear view camera installation. The RCA video cable must travel from the trunk area all the way to the dashboard monitor. Remove door sill plates and pillar trim panels using a plastic trim tool — never use a metal screwdriver, as it will scratch or crack the plastic. Tuck the cable under the carpet along the sill, hiding it behind the trim. Along pillar covers, push the cable into the gap between the pillar cover and the headliner using a trim tool or a flat credit card.
Where cables pass through any rubber weather strip or door seal, wrap the cable in wire loom or split tubing to protect it from abrasion. Sharp metal edges inside the vehicle body can cut through cable insulation over time, leading to a shorted video signal. Secure all loose cable sections with adhesive cable clips or zip ties every 12 to 18 inches. Make sure there is no tension in the cable and that it does not catch or pinch when you open and close the trunk or rear hatch.
Step 5 — Run the Trigger Wire (If Required)
Many standalone monitors require a reverse trigger wire in addition to the video cable. This wire carries the 12V reverse signal from the rear of the vehicle to the monitor, telling it to switch to the camera input automatically when reverse is engaged. Route this wire alongside the RCA cable. Some modern monitors can auto-detect the video feed and do not need a separate trigger wire — check your monitor's manual to confirm whether this step applies to your system.
Step 6 — Mount and Connect the Monitor
Common monitor locations include: a suction cup or adhesive mount on the windshield, an overhead console attachment, a dash-mounted bracket, or a replacement rearview mirror with a built-in screen. Position the monitor where it is easily visible without requiring you to take your eyes off the road for more than a fraction of a second. The monitor should never block your forward sightlines. Connect the RCA cable from the camera to the video input on the monitor. Connect the monitor's power wire to a switched 12V source — the fuse box or the accessory wire on your head unit are both acceptable. Connect the trigger wire to the monitor's reverse input if needed.
Step 7 — Test the System Before Reassembling Trim
Do not reinstall any trim panels until you have fully tested the system. Turn on the vehicle, shift into reverse, and verify the camera image appears on the monitor. Check that the image is level and that the viewing angle is correct. Walk behind the vehicle and verify the camera can clearly see objects at various distances. If the image appears but is upside down, check your camera's image flip settings — most cameras have a physical or menu-based switch to invert the image for proper orientation. Once everything checks out, reassemble all trim panels and secure all cable runs.
Wireless Rear View Camera: Installation Differences and Considerations
Wireless backup camera systems eliminate most of the cable routing work, making them a popular choice for beginners and for vehicle owners who want a clean installation without removing interior panels. The camera still requires a power connection at the rear — typically tapped into the reverse light circuit — but the video signal is transmitted via a 2.4 GHz or 5.8 GHz wireless module to a receiver connected to the dashboard monitor.
The transmitter is mounted near the camera at the rear of the vehicle and requires its own power connection. The receiver connects to the monitor at the front and requires a power source as well. Pairing the transmitter and receiver is typically a plug-and-play process, though in some cases you may need to manually pair them using buttons on the units.
The main trade-off with wireless systems is potential signal interference and slightly lower video quality compared to a wired RCA connection. In environments with heavy RF interference — dense urban areas, commercial parking lots with multiple wireless devices — some wireless systems can experience lag or dropouts. For everyday passenger car use in normal conditions, a quality 5.8 GHz wireless system performs reliably. For commercial vehicles, RVs, or any application where the camera is critical safety equipment, a wired system is the more dependable choice.
Installation Variations by Vehicle Type
The general installation process is the same across vehicle types, but each body style presents specific challenges worth understanding before you start.
Sedans
Sedans offer the simplest installation scenario. The compact interior means shorter cable runs, and the license plate area is almost always a suitable camera mounting location. Accessing the trunk wiring through the trunk liner is straightforward in most models. A full installation on a mid-size sedan typically takes 60 to 90 minutes for a first-time installer.
SUVs and Crossovers
Larger vehicles require longer cable runs — expect to add at least 4 to 6 feet compared to a sedan. The rear liftgate on SUVs and crossovers moves independently from the body, which means any cable that crosses from the rear hatch to the body must be routed through the flexible rubber weather strip channel or the factory wire conduit in the hinge area. Forcing a stiff cable through a moving hinge without proper protection will cause the cable insulation to crack and fail within months. Use wire loom and route generously to allow for full hatch movement without cable tension.
Pickup Trucks
Pickup trucks often have the camera mounted under the tailgate lip or on the rear bumper. Cable routing requires going around or through the truck bed, which can be more involved than routing through a finished interior. Running the cable inside the cab underneath the bed liner or along the frame rail are both valid approaches. Some installers prefer to use a wireless camera on pickup trucks specifically to avoid the complexity of routing cables around the bed.
Hatchbacks and Wagons
Hatchbacks offer good storage space behind the rear seats that makes wire management relatively easy. Camera mounting near the license plate or on the rear glass works well for this body style. The same liftgate wire routing considerations that apply to SUVs apply here — any cable crossing the hinge must be protected and given adequate slack.
RVs and Trailers
RVs and trailers require heavy-duty, weatherproof camera housings and typically use larger monitors (7 to 10 inches) to provide adequate visibility over longer distances. Wireless systems with stronger antennae are commonly used on trailers, as running a physical cable the full length of a trailer introduces complexity. When choosing an RV or trailer camera system, look for a sealed IP69K-rated housing and a system that supports a dedicated reverse trigger or a continuous-view mode for monitoring rear traffic while driving.
Common Installation Mistakes and How to Avoid Them
Even experienced DIY mechanics make these errors during rear view camera installation. Being aware of them in advance saves time and prevents damage to your vehicle or the camera system.
- Poor ground connection: A camera grounded to a painted surface or a loose bolt will cause video noise, flickering, or total signal failure. Always grind or scrape the paint from the grounding point to expose bare metal.
- Incorrect cable length: Buying a cable that is too short and then splicing an extension introduces signal degradation. Measure your route before purchasing and buy a cable with at least 2 feet of extra length.
- Skipping weatherproofing: Any cable penetration through the vehicle exterior must be sealed with a rubber grommet and silicone sealant. Water intrusion through a poorly sealed hole will eventually damage the vehicle interior and corrode wiring connections.
- Routing cables near heat sources: Cable runs near catalytic converters, exhaust manifolds, or turbocharger components can melt insulation. Always maintain at least 4 to 6 inches of clearance from any heat source, and use heat-resistant wire loom in close proximity areas.
- Mounting before checking the viewing angle: Always dry-fit the camera and verify the view on the monitor before making any permanent mount. Repositioning a camera after adhesive has cured is significantly more difficult.
- Using quick-splice connectors: These tap-style connectors work initially but corrode and create intermittent connections in the wet rear environment. Solder or crimp butt connectors are far more reliable for a long-term installation.
- Forgetting to check the image flip setting: If your camera image appears upside down, this is almost always a flip setting that needs to be toggled, not a wiring error. Most cameras have a small physical switch on the body or a setting in their configuration menu.
Integrating with an Existing Head Unit or Factory Display
Many vehicles built after 2010 have an aftermarket or factory head unit with a touchscreen that accepts a rear camera input. If your vehicle has this capability, you can integrate the rear view camera directly with the existing head unit instead of adding a separate monitor — which gives the installation a much cleaner, OEM-quality appearance.
To do this, locate the camera input port on the back of the head unit, which is typically an RCA connector or a dedicated camera input plug. Some factory head units in vehicles from major manufacturers require an interface module that converts the camera signal into a format the factory system can display. These interface modules — sometimes called factory camera integration modules — are model-specific automobile parts that cost between $50 and $150.
When installing alongside a new aftermarket radio, it is efficient to run the reverse trigger wire and camera video cable at the same time as the head unit wiring harness. The reverse trigger wire connects to the reverse wire on the head unit harness, which is typically labeled "Reverse" or "Back-Up" on the harness adapter documentation and is often a purple or orange wire depending on the harness standard.
Camera Maintenance and Longevity Tips
A properly installed rear view camera should perform reliably for many years. A few straightforward maintenance practices will extend its service life and keep the image quality high.
- Clean the camera lens regularly with a microfibre cloth. Road grime, mud, and water spots accumulate quickly on cameras mounted near the bumper or license plate and noticeably reduce image clarity.
- After any vehicle wash, inspect the sealant around the camera mount and the cable entry point. Re-apply silicone sealant if cracking or separation is visible.
- Inspect the cable run at the trunk or hatch hinge annually. Any sign of chafing or cracking in the insulation at hinge points indicates the cable needs to be re-routed with more slack or better protection.
- If video quality drops noticeably during wet weather, this usually points to moisture ingress at the camera housing or a corroding power connection. Inspect and reseal the mounting and check the power splices at the tail light assembly.
- In climates with harsh winters, use a camera with a built-in heating element if available. Heated camera models maintain visibility in freezing conditions where ice and condensation would otherwise obscure a standard lens.
A rear view camera is one of the most practical safety-related automobile parts you can add to any vehicle. When installed correctly using the steps outlined in this guide, it provides years of reliable service, eliminates the risk of backing into obstacles you cannot see, and can be a decisive factor in avoiding low-speed accidents in parking lots — situations that account for roughly 20% of all vehicle collisions reported annually in major markets.